ML-Agentsの新しい学習環境の作成方法についてを記事にしました。
- [ 記事内容 ]
- [ 環境 ]
- [ 注意事項 ]
- [ Pythonのインストール ]
- [ Pyhtonの仮想環境の構築と有効化 ]
- [ ML-Agentsのダウンロード ]
- [ ML-Agentsの準備 ]
- [ Unityプロジェクトの作成 ]
- [ 学習環境の準備1 ]
- [ 学習環境の準備2 ]
- [ 学習設定ファイルの作成 ]
- [ 学習開始 ]
- [ 学習結果の確認 ]
- [ 参考文献 ]
[ 記事内容 ]
下記サイトの「Making a New Learning Environment」を日本語で紹介します。
github.com
[ 環境 ]
・Windows10
・Unity 2021.1.1f1 Personal
・Python 3.7.9
・ML-Agents Release 18
・mlagents 0.27.0
・PyTorch 1.7.1
[ 注意事項 ]
・この記事内の「hogehoge」「piyopiyo」「fugafuga」「kirakira」の部分に特に意味はありません。好きな名前に変更して大丈夫です。
・ファイルパスやフォルダパス、ファイル内に日本語が含まれているとエラーが発生する場合があります。実際、後ほど作成するフォルダ名やyamlファイル内のコメントを日本語にした際にエラーが発生しました。
[ Pythonのインストール ]
下記のサイトにアクセスします。
www.python.org
Python3.6.1以降のインストーラーをダウンロードします。今回はPython3.7.9の64bit版のインストーラーをダウンロードします。
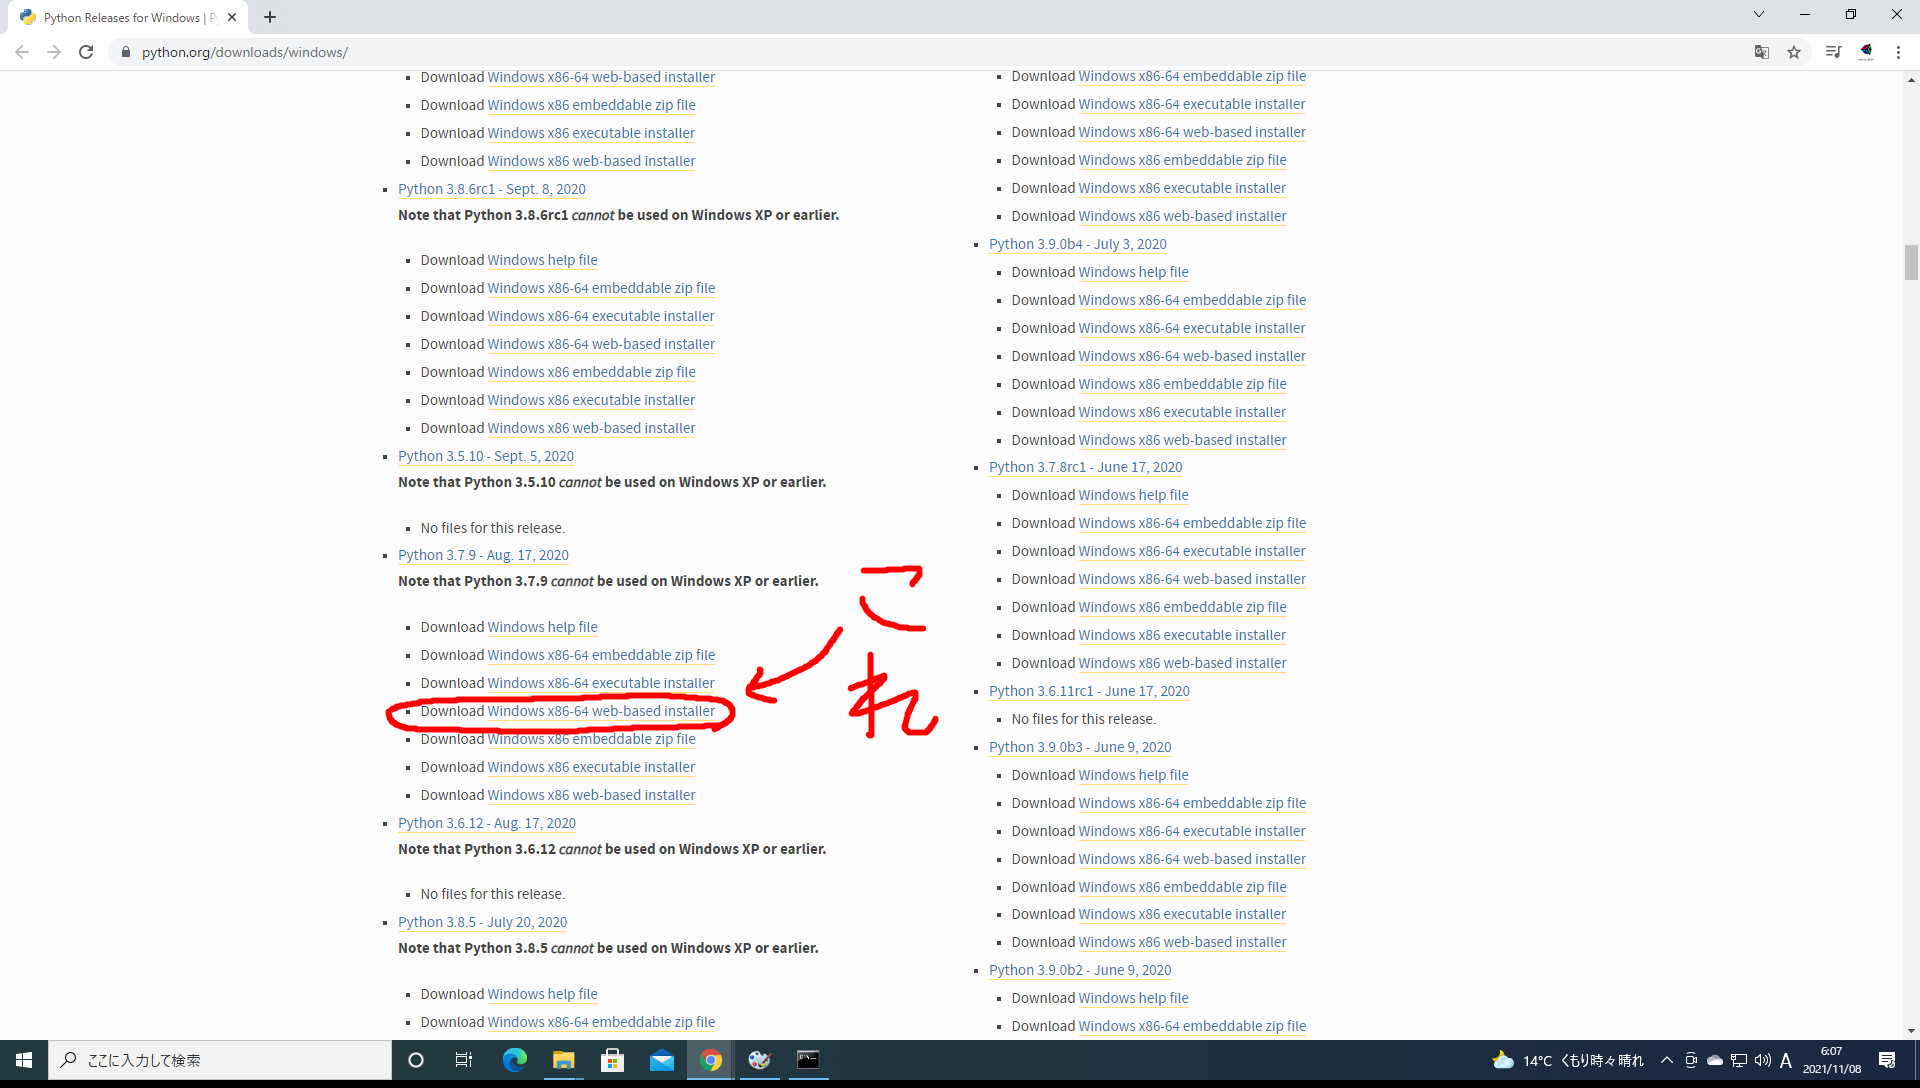
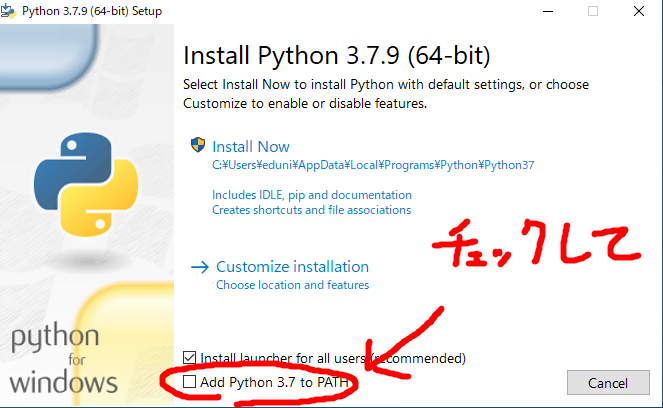
ダウンロードが完了したインストーラーを実行すると下記のようになるので、「Add Python 3.7 to PATH」にチェックを入れて「Install Now」を押し、Pythonをインストールします。
[ Pyhtonの仮想環境の構築と有効化 ]
以下の操作はPythonインストールが完了した状態で行ってください。
下記のようにタスクバーの検索ボックスに「cmd」と入力してコマンドプロンプトを開きます。

コマンドプロンプトを開いたら下記のように「cd Desktop」と入力しエンターを押してカレントディレクトリをデスクトップに変更します。
Microsoft Windows [Version 10.0.19043.1320]
(c) Microsoft Corporation. All rights reserved.

C:\Users\eduni>cd Desktop
下記のように「mkdir hogehoge」と入力しエンターを押してデスクトップに「hogehoge」という名前のフォルダを作成します。
Microsoft Windows [Version 10.0.19043.1320]
(c) Microsoft Corporation. All rights reserved.

C:\Users\eduni>cd Desktop

C:\Users\eduni\Desktop>mkdir hogehoge
下記のように「cd hogehoge」と入力しエンターを押してカレントディレクトリを「hoghoge」に変更します。
Microsoft Windows [Version 10.0.19043.1320]
(c) Microsoft Corporation. All rights reserved.

C:\Users\eduni>cd Desktop

C:\Users\eduni\Desktop>mkdir hogehoge

C:\Users\eduni\Desktop>cd hogehoge
下記のように「python -m venv piyopiyo」と入力しエンターを押して「piyopiyo」という名前の仮想環境を構築します。
Microsoft Windows [Version 10.0.19043.1320]
(c) Microsoft Corporation. All rights reserved.

C:\Users\eduni>cd Desktop

C:\Users\eduni\Desktop>mkdir hogehoge

C:\Users\eduni\Desktop>cd hogehoge

C:\Users\eduni\Desktop\hogehoge>python -m venv piyopiyo
下記のように「piyopiyo\Scripts\activate.bat」と入力しエンターを押して「piyopiyo」という仮想環境を有効化します。
Microsoft Windows [Version 10.0.19043.1320]
(c) Microsoft Corporation. All rights reserved.

C:\Users\eduni>cd Desktop

C:\Users\eduni\Desktop>mkdir hogehoge

C:\Users\eduni\Desktop>cd hogehoge

C:\Users\eduni\Desktop\hogehoge>python -m venv piyopiyo

C:\Users\eduni\Desktop\hogehoge>piyopiyo\Scripts\activate.bat
仮想環境の有効化に成功すると下記のようにコマンドプロンプトの左側に「(piyopiyo)」と表示されます。
(piyopiyo) C:\Users\eduni\Desktop\hogehoge>
[ ML-Agentsのダウンロード ]
下記のサイトにアクセスします。
github.com
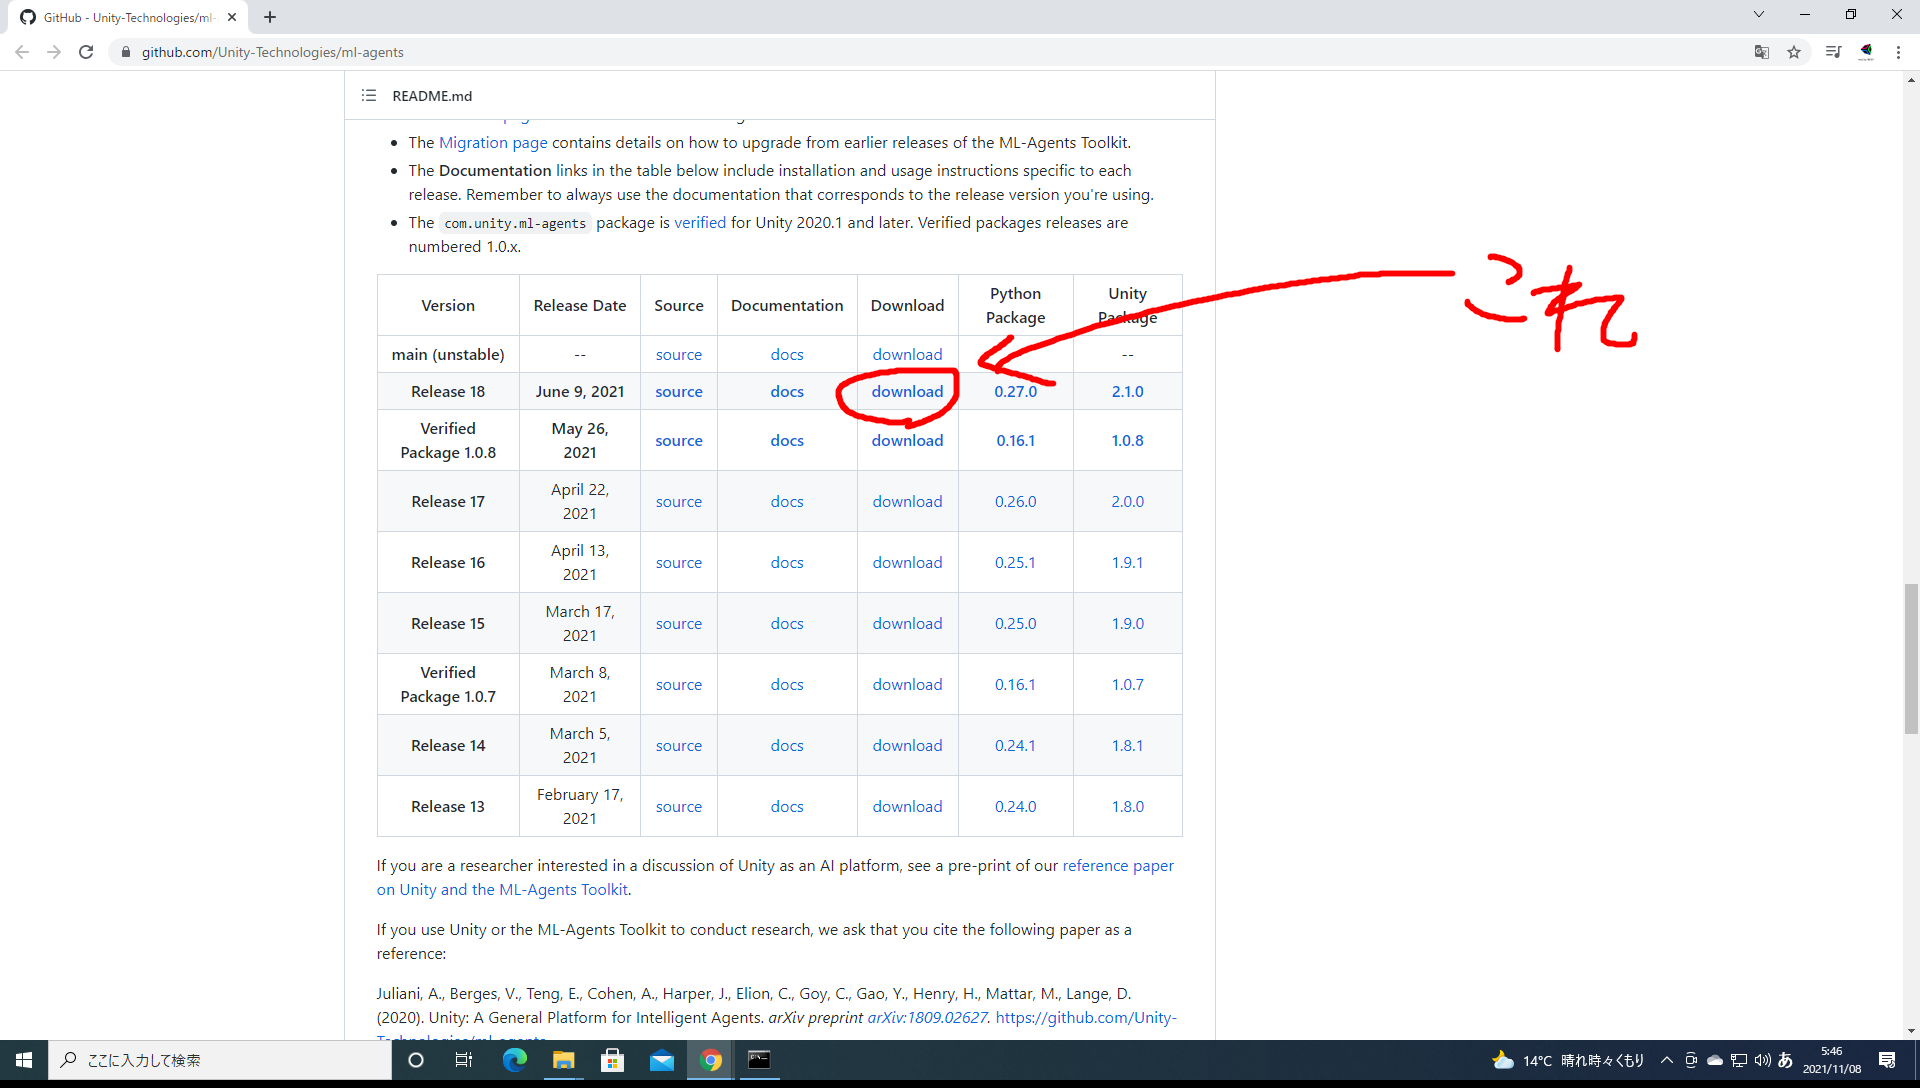
下のほうにスクロールしていって「Release 18」の「Download」を押して「ml-agents-release_18.zip」のダウンロードを開始します。ダウンロードが完了したらデスクトップに展開してください。
[ ML-Agentsの準備 ]
以下の操作は仮想環境が有効化されている状態で行ってください。
下記のように「cd ..」と入力しエンターを押し、カレントディレクトリをデスクトップに変更します。
(piyopiyo) C:\Users\eduni\Desktop\hogehoge>cd ..
下記のように「cd ml-agents-release_18」と入力しエンターを押してカレントディレクトリをデスクトップに展開した「ml-agents-release_18」に変更します。
(piyopiyo) C:\Users\eduni\Desktop\hogehoge>cd ..

(piyopiyo) C:\Users\eduni\Desktop>cd ml-agents-release_18
下記のように「pip install --upgrade pip」と入力しエンターを押します。
(piyopiyo) C:\Users\eduni\Desktop\hogehoge>cd ..

(piyopiyo) C:\Users\eduni\Desktop>cd ml-agents-release_18

(piyopiyo) C:\Users\eduni\Desktop\ml-agents-release_18>pip install --upgrade pip
下記のように「pip install torch==1.7.1 -f https://download.pytorch.org/whl/torch_stable.html」と入力しエンターを押てtPyTorch1.7.1をインストールします。
(piyopiyo) C:\Users\eduni\Desktop\hogehoge>cd ..

(piyopiyo) C:\Users\eduni\Desktop>cd ml-agents-release_18

(piyopiyo) C:\Users\eduni\Desktop\ml-agents-release_18>pip install --upgrade pip

(piyopiyo) C:\Users\eduni\Desktop\ml-agents-release_18>pip install torch==1.7.1 -f https://download.pytorch.org/whl/torch_stable.html
下記のように「pip install -e ./ml-agents」と入力しエンターを押します。
(piyopiyo) C:\Users\eduni\Desktop\hogehoge>cd ..

(piyopiyo) C:\Users\eduni\Desktop>cd ml-agents-release_18

(piyopiyo) C:\Users\eduni\Desktop\ml-agents-release_18>pip install --upgrade pip

(piyopiyo) C:\Users\eduni\Desktop\ml-agents-release_18>pip install torch==1.7.1 -f https://download.pytorch.org/whl/torch_stable.html

(piyopiyo) C:\Users\eduni\Desktop\ml-agents-release_18>pip install -e ./ml-agents
下記のように「pip install -e ./ml-agents-envs」と入力しエンターを押します。
(piyopiyo) C:\Users\eduni\Desktop\hogehoge>cd ..

(piyopiyo) C:\Users\eduni\Desktop>cd ml-agents-release_18

(piyopiyo) C:\Users\eduni\Desktop\ml-agents-release_18>pip install --upgrade pip

(piyopiyo) C:\Users\eduni\Desktop\ml-agents-release_18>pip install torch==1.7.1 -f https://download.pytorch.org/whl/torch_stable.html

(piyopiyo) C:\Users\eduni\Desktop\ml-agents-release_18>pip install -e ./ml-agents

(piyopiyo) C:\Users\eduni\Desktop\ml-agents-release_18>pip install -e ./ml-agents-envs
[ Unityプロジェクトの作成 ]
下記のようにUnityプロジェクトを「3D」で作成します。

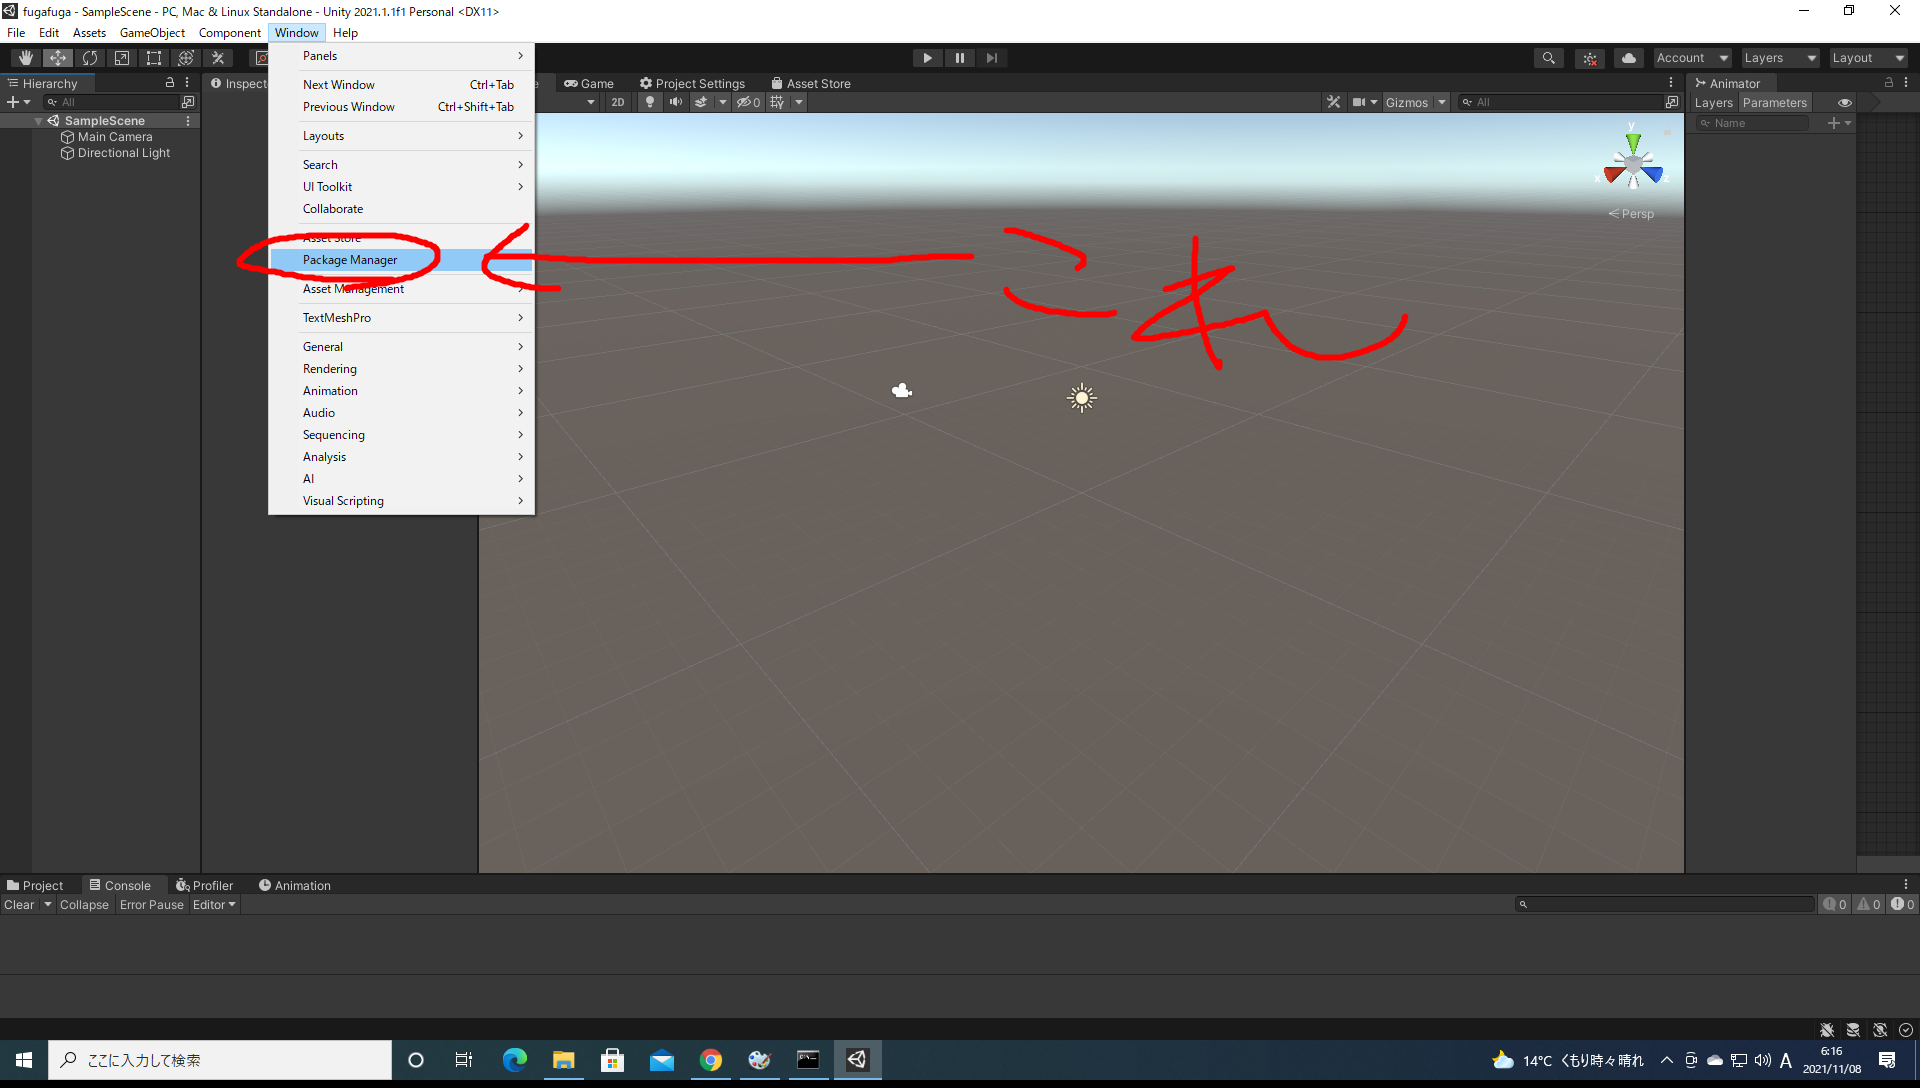
下記のようにメニューバーの「Window」から「Package Managr」を開きます。
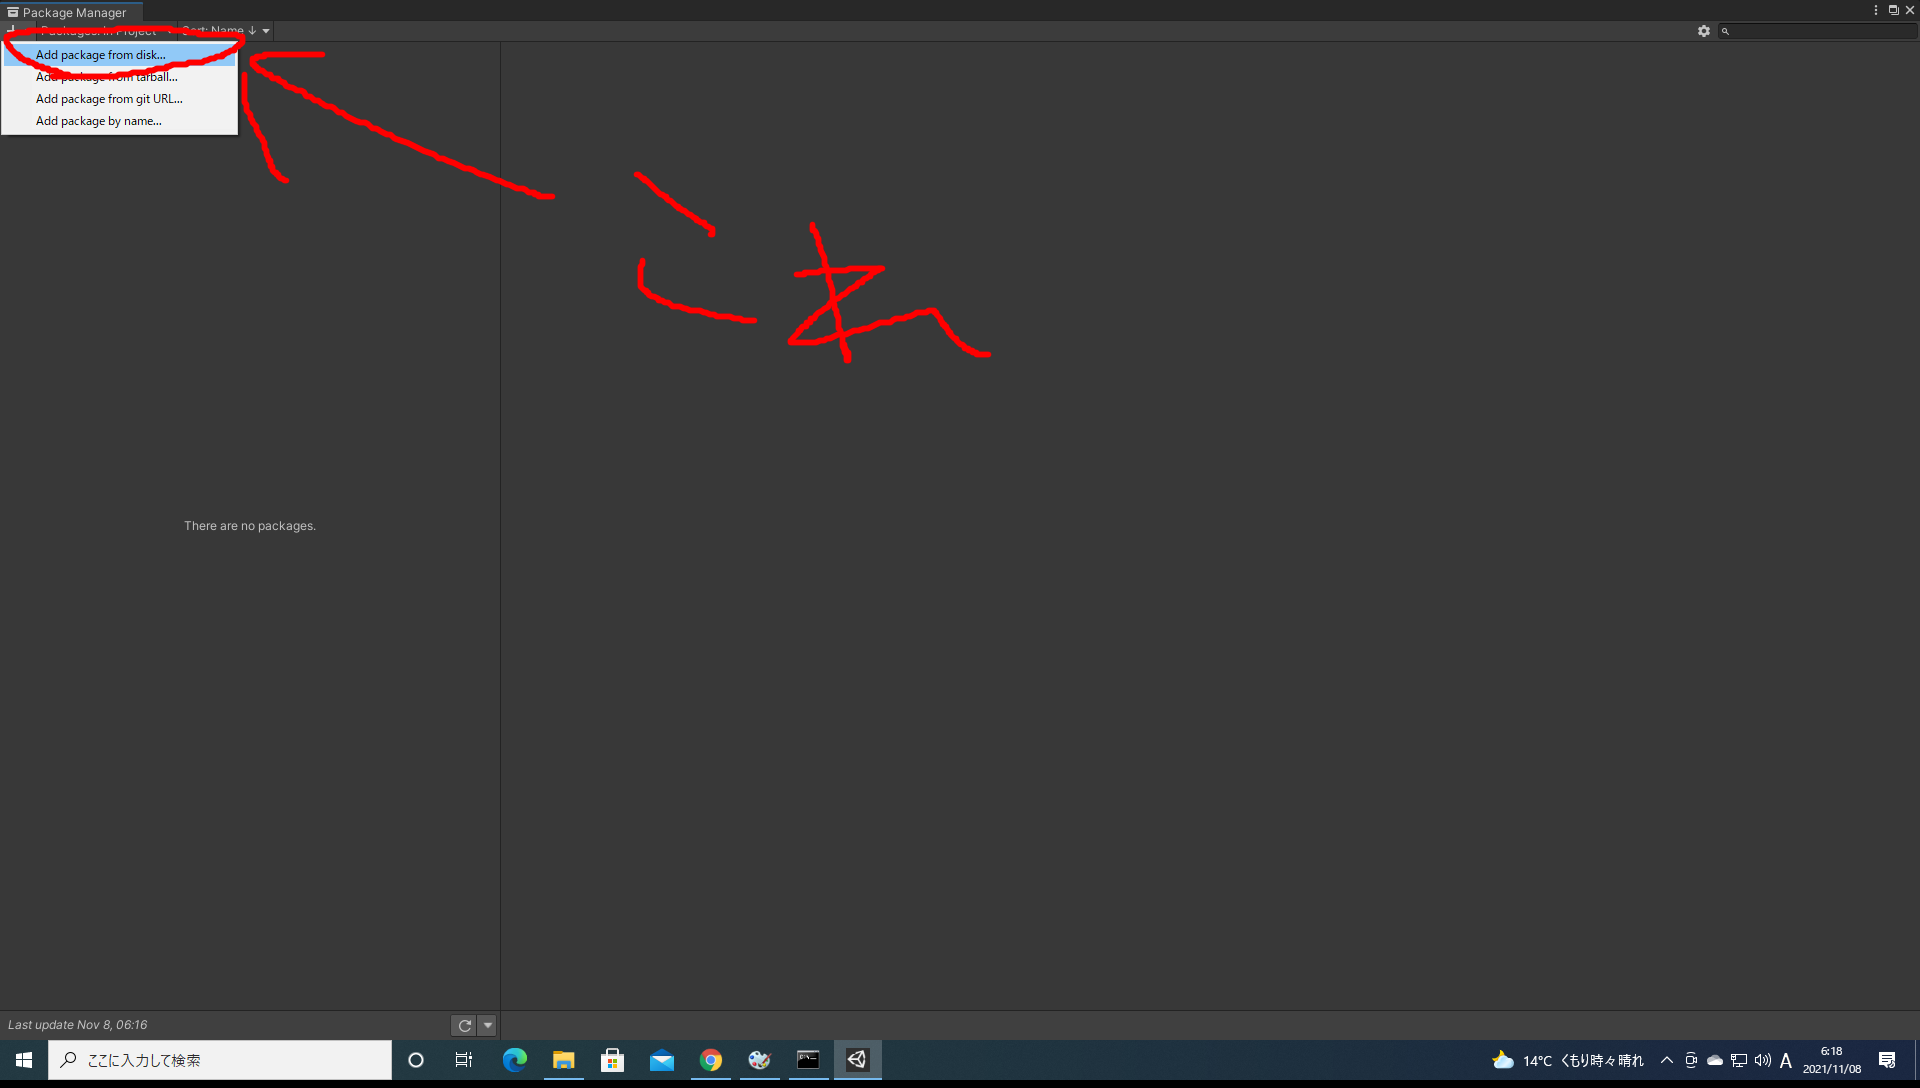
下記のように画面左上の「+」から「Add package from disk」を押してデスクトップに展開した「ml-agents-release_18」内の「com.unity.ml-agents」内の「package.json」を選択します。
[ 学習環境の準備1 ]
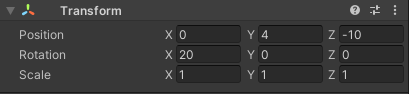
ヒエラルキー内の「Main Camera」を選択して下記のようにPositionを(0, 4, -10)、Rotationを(20, 0, 0)、Scaleを(1, 1, 1)に設定します。
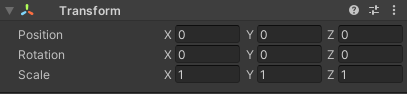
ヒエラルキー内に「Plane」を作成して名前を「Floor」に変更し、下記のようにPositionを(0, 0, 0)、Rotationを(0, 0, 0)、Scaleを(1, 1, 1)に設定します。
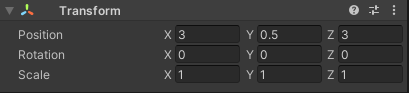
ヒエラルキー内に「Cube」を作成して名前を「Target」に変更し、下記のようにPositionを(3, 0.5, 3)、Rotationを(0, 0, 0)、Scaleを(1, 1, 1)に設定します。
ヒエラルキー内に「Sphere」を作成して名前を「RollerAgent」に変更し、下記のようにPositionを(0, 0.5, 0)、Rotationを(0, 0, 0)、Scaleを(1, 1, 1)に設定します。
また、「Add Component」から「Rigidbody」を追加します。

[ 学習環境の準備2 ]
「RollerAgent」に「Behavior Parameters」を追加してパラメーターを下記のように設定します。

「RollerAgent」に「Add Component」から「new script」を選択して「RollerAgent」という名前の新規スクリプトを追加します。追加した「RollerAgent.cs」の中身は下記のように設定します。
using System.Collections.Generic;
using UnityEngine;
using Unity.MLAgents;
using Unity.MLAgents.Sensors;
using Unity.MLAgents.Actuators;
using Unity.MLAgents.Policies;

public class RollerAgent : Agent
{
    public Transform target;
    Rigidbody rBody;

    public override void Initialize()
    {
        this.rBody = GetComponent<Rigidbody>();
    }

    public override void OnEpisodeBegin()
    {
        if (this.transform.localPosition.y < 0)
        {
            this.rBody.angularVelocity = Vector3.zero;
            this.rBody.velocity = Vector3.zero;
            this.transform.localPosition = new Vector3(0.0f, 0.5f, 0.0f);
        }

        target.localPosition = new Vector3(Random.value*8-4, 0.5f, Random.value*8-4);
    }

    public override void CollectObservations(VectorSensor sensor)
    {
        sensor.AddObservation(target.localPosition);
        sensor.AddObservation(this.transform.localPosition);
        sensor.AddObservation(rBody.velocity.x);
        sensor.AddObservation(rBody.velocity.z);
    }

    public override void OnActionReceived(ActionBuffers actionBuffers)
    {
        Vector3 controlSignal = Vector3.zero;
        controlSignal.x = actionBuffers.ContinuousActions[0];
        controlSignal.z = actionBuffers.ContinuousActions[1];
        rBody.AddForce(controlSignal * 10);

        float distanceToTarget = Vector3.Distance(this.transform.localPosition, target.localPosition);

        if(distanceToTarget < 1.42f)
        {
             AddReward(1.0f);
            EndEpisode();
        }

        if(this.transform.localPosition.y < 0)
        {
            EndEpisode();
        }
    }

    public override void Heuristic(in ActionBuffers actionsOut)
    {
        var continuousActionsOut = actionsOut.ContinuousActions;
        continuousActionsOut[0] = Input.GetAxis("Horizontal");
        continuousActionsOut[1] = Input.GetAxis("Vertical");
    }
}
「RollerAgent」に追加した「RollerAgent.cs」のパラメーターを下記のように設定します。
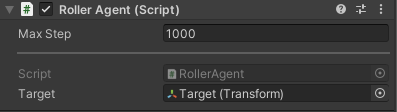
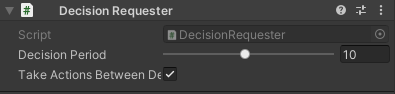
「RollerAgent」に「Decision Requester」を追加してパラメーターを下記のように設定します。
[ 学習設定ファイルの作成 ]
下記のようにデスクトップに展開した「ml-agents-release_18」内の「config」内に「RollerBall.yaml」を作成します。

作成した「RollerBall.yaml」の中身は下記のように設定します。
behaviors:
  RollerBall:
    trainer_type: ppo

    max_steps: 500000
    time_horizon: 1000
    summary_freq: 12000
    keep_checkpoints: 5

    hyperparameters:
      batch_size: 64
      buffer_size: 12000
      learning_rate: 0.0003
      beta: 0.001
      epsilon: 0.2
      lambd: 0.99
      num_epoch: 3
      learning_rate_schedule: linear

    network_settings:
      normalize: true
      hidden_units: 128
      num_layers: 2
      vis_encode_type: simple

    reward_signals:
      extrinsic:
        gamma: 0.99
        strength: 1.0
[ 学習開始 ]
以下の操作は仮想環境が有効化されている状態で行ってください。
下記のようにカレントディレクトリがデスクトップに展開した「ml-agents-release_18」になっている状態で、コマンドプロンプトに「mlagents-learn ./config/RollerBall.yaml --run-id=kirakira」と入力しエンターを押します。
今回の「--run-id」は「kirakira」ですが、このIDは学習毎に変更してください。
(piyopiyo) C:\Users\eduni\Desktop\hogehoge>cd ..

(piyopiyo) C:\Users\eduni\Desktop>cd ml-agents-release_18

(piyopiyo) C:\Users\eduni\Desktop\ml-agents-release_18>pip install --upgrade pip

(piyopiyo) C:\Users\eduni\Desktop\ml-agents-release_18>pip install torch==1.7.1 -f https://download.pytorch.org/whl/torch_stable.html

(piyopiyo) C:\Users\eduni\Desktop\ml-agents-release_18>pip install -e ./ml-agents

(piyopiyo) C:\Users\eduni\Desktop\ml-agents-release_18>pip install -e ./ml-agents-envs

(piyopiyo) C:\Users\eduni\Desktop\ml-agents-release_18>mlagents-learn ./config/RollerBall.yaml --run-id=kirakira
「mlagents-learn ./config/RollerBall.yaml --run-id=kirakira」を入力しエンターを押すとコマンドプロンプトに下記が表示されます。これが表示されたらUnityEditorの「再生ボタン」を押して学習を開始してください。
                        ▄▄▄▓▓▓▓
                   ╓▓▓▓▓▓▓█▓▓▓▓▓
              ,▄▄▄m▀▀▀'  ,▓▓▓▀▓▓▄                           ▓▓▓  ▓▓▌
            ▄▓▓▓▀'      ▄▓▓▀  ▓▓▓      ▄▄     ▄▄ ,▄▄ ▄▄▄▄   ,▄▄ ▄▓▓▌▄ ▄▄▄    ,▄▄
          ▄▓▓▓▀        ▄▓▓▀   ▐▓▓▌     ▓▓▌   ▐▓▓ ▐▓▓▓▀▀▀▓▓▌ ▓▓▓ ▀▓▓▌▀ ^▓▓▌  ╒▓▓▌
        ▄▓▓▓▓▓▄▄▄▄▄▄▄▄▓▓▓      ▓▀      ▓▓▌   ▐▓▓ ▐▓▓    ▓▓▓ ▓▓▓  ▓▓▌   ▐▓▓▄ ▓▓▌
        ▀▓▓▓▓▀▀▀▀▀▀▀▀▀▀▓▓▄     ▓▓      ▓▓▌   ▐▓▓ ▐▓▓    ▓▓▓ ▓▓▓  ▓▓▌    ▐▓▓▐▓▓
          ^█▓▓▓        ▀▓▓▄   ▐▓▓▌     ▓▓▓▓▄▓▓▓▓ ▐▓▓    ▓▓▓ ▓▓▓  ▓▓▓▄    ▓▓▓▓`
            '▀▓▓▓▄      ^▓▓▓  ▓▓▓       └▀▀▀▀ ▀▀ ^▀▀    `▀▀ `▀▀   '▀▀    ▐▓▓▌
               ▀▀▀▀▓▄▄▄   ▓▓▓▓▓▓,                                      ▓▓▓▓▀
                   `▀█▓▓▓▓▓▓▓▓▓▌
                        ¬`▀▀▀█▓


 Version information:
  ml-agents: 0.27.0,
  ml-agents-envs: 0.27.0,
  Communicator API: 1.5.0,
  PyTorch: 1.7.1+cu110
[INFO] Listening on port 5004. Start training by pressing the Play button in the Unity Editor.何の問題もなく学習を開始できるとコマンドプロンプトに下記が表示されます。
[INFO] Connected to Unity environment with package version 2.1.0-exp.1 and communication version 1.5.0
[INFO] Connected new brain: RollerBall?team=0
[INFO] Hyperparameters for behavior name RollerBall:
        trainer_type:   ppo
        hyperparameters:
          batch_size:   64
          buffer_size:  12000
          learning_rate:        0.0003
          beta: 0.001
          epsilon:      0.2
          lambd:        0.99
          num_epoch:    3
          learning_rate_schedule:       linear
        network_settings:
          normalize:    True
          hidden_units: 128
          num_layers:   2
          vis_encode_type:      simple
          memory:       None
          goal_conditioning_type:       hyper
        reward_signals:
          extrinsic:
            gamma:      0.99
            strength:   1.0
            network_settings:
              normalize:        False
              hidden_units:     128
              num_layers:       2
              vis_encode_type:  simple
              memory:   None
              goal_conditioning_type:   hyper
        init_path:      None
        keep_checkpoints:       5
        checkpoint_interval:    500000
        max_steps:      500000
        time_horizon:   1000
        summary_freq:   12000
        threaded:       False
        self_play:      None
        behavioral_cloning:     None
[INFO] Learning was interrupted. Please wait while the graph is generated.
[INFO] Exported results\kirakira\RollerBall\RollerBall-125.onnx
[INFO] Copied results\kirakira\RollerBall\RollerBall-125.onnx to results\kirakira\RollerBall.onnx.
学習を終了したい時はUnityEditorの「再生ボタン」を再度押すことで終了できます。
[ 学習結果の確認 ]
学習したモデルは「ml-agents-release_18/ewsults/kirakira/RollerBall/RollerBall.onnx」に保存されています。
この「RollerBall.onnx」をUnityEditor内のAssetsにドラッグ&ドロップしてヒエラルキー内の「RollerAgent」の「Behavior Parameters」の「Model」にドラッグ&ドロップしてください。
その後UnityEditorの「再生ボタン」を押すと学習したモデルの挙動を確認することができます。